How to add maps to your Titanium SDK mobile app
A feature that many apps have in common is a map with annotations. This tutorial will create a basic app with a map and annotations.
Project setup
We will start with an empty Alloy project.
ti create
# go into the folder
alloy new
Have a look at the last section of the first tutorial.
Add the Map module
The Map view is an external plug-in that is maintained by TiDev and installed by default with when you download a Titanium SDK. To activate/include it inside your project you have to edit the tiapp.xml and add it to the modules section. Search for <modules> and at this:
<modules>
    <module>ti.map</module>
</modules>
This will allow you to use the module for iOS and Android.
Other external modules are added like this, too. But we will only use the Map module in this tutorial.
Android / Goolge API key
On Android you need to have a Google API key to use the Goolge Maps. Go to https://console.developers.google.com/apis/ and create a new project.
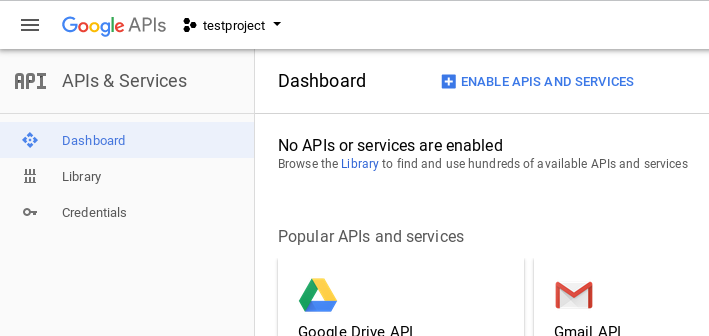
Click on Enable APIs and services, search for maps android, click on Google Maps Android API and Enable it in the next screen.
To get the API key you go to the the Credentials section and create a new API key:

Copy the API key it will show you. For this tutorial we keep the unrestricted access but you could also configure it to only be used by your app.
This key has to go into the tiapp.xml. Search for the <android xmlns:android="http://schemas.android.com/apk/res/android"> part and add the following lines (exchange [YOUR_KEY_HERE] with the key from above):
<android xmlns:android="http://schemas.android.com/apk/res/android">
    <manifest>
        <application>
            <meta-data android:name="com.google.android.geo.API_KEY" android:value="[YOUR_KEY_HERE]" />
        </application>
    </manifest>
</android>
iOS
Add NSLocationAlwaysUsageDescription or NSLocationWhenInUseUsageDescription to your tiapp.xml <plist><dict> block:
 <key>NSLocationAlwaysUsageDescription</key>
        <string>
            Specify the reason for accessing the user's location information.
            This appears in the alert dialog when asking the user for permission to
            access their location.
        </string>
Since iOS uses the native Apple Maps you don't have to do anything else on this side.
Add the view
In the first step we add the Map module to the global space so we can use it in all files. Open the alloy.js and add
Alloy.Globals.Map = require('ti.map');so we can use Alloy.Globals.Map globally.
In your index.xml we place a `<Module> element that is connected to the Map module and has an ID so we can access it in the style or controller:
<Alloy>
    <Window>
        <Module module="ti.map" id="view_map"></Module>
    </Window>
</Alloy>
If you run your project on your phone ti build -p android -T device you will see a fullscreen map.
Style the map
The map view has many properties you can change to adjust the look and feel. For a full overview have a look at the properties in the documentation: https://titaniumsdk.com/api/modules/map/view.html
One think you want to change is the initial location that will be visible. To do this you can change the region property and set it to a custom longitude/latitude and longitudeDelta/latitudeDelta (zooming factor).
"#view_map" : {
    region: {
        latitude: 52.52001,
        longitude: 13.40495,
        latitudeDelta: 1,
        longitudeDelta: 1
    }
}
Add annotations

Annotations are the little pins on the map. You can add them inside your view or controller. In your XML you can do it like this:
<Alloy>
    <Window>
        <Module module="ti.map" id="view_map">
            <Annotation id="anno1" title="Anno1" subtitle="Subtitle 1" latitude="52.23" longitude="13.401"/>
            <Annotation id="anno2" title="Anno2" subtitle="Subtitle 2" latitude="52.42" longitude="13.205"/>
        </Module>
    </Window>
</Alloy>
title and subtitle will be visible when you click on the pins.
If you receive the coordinates via an API or want to add them in your controller you can use the following code:
// create annotation
var an1 = Alloy.Globals.Map.createAnnotation({
    latitude: 52.23,
    longitude: 13.401,
    title: "Anno 1",
    subtitle: "Subtitle 1"
});
// create annotation
var an2 = Alloy.Globals.Map.createAnnotation({
    latitude: 52.42,
    longitude: 13.205,
    title: "Anno 2",
    subtitle: "Subtitle 2"
});

// add them to the map
$.view_map.annotations = [an1, an2];

$.index.open();
Click event
You have a Map with annotations. Now it would be nice to know if the user clicks on a pin and react to it. Like in the First app tutorial we register an event to catch the clicks.
function onClickMap(e){
    console.log(e.clicksource, e.annotation.title);
}
$.view_map.addEventListener("click",onClickMap);
When you click on a pin it will output pin Anno 1 (the element you've click on + title of that annotation). It will also show title, subtitle or infoWindow. So if you want to react on the 2nd click on the popup you have to check all three cases.
If you added a custom property like customID you access it inside the click event with e.annotation.customID.